6,2 Ways to work with light
„My pic of this hot women in red looks like shit“ said Heinz-Günther and stopped street photography. Don’t be like Heinz-Günther. Keep in mind that we paint with light. So remember the different aspects of light sources. I’ll show you some ways to work with light and improve your skills
First of all, as you may know, light is key to make a picture. Without light, we would end up in losing our daily fun with the camera. So, let’s have a closer look at the enormous topic #light. How can we develop an eye for various atmospheres? How can we actively work with light?
Frank shoots doors. So far, so well known. But as you might have heard, he was recently a guest at Valerie Jardin’s Podcast. In this episode, he not only talked about the important topic of depression — he also had a small but important part about light:
[…] I was walking by the same door that I photographed in […] January and I saw this the other day [in Summer] […]. The door looked totally different. The situation was different, The light was different – It was a total different story.
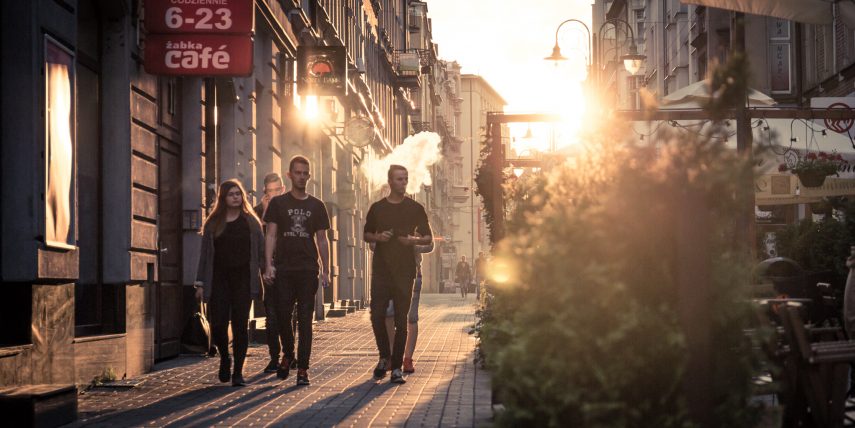
Frank is not the only one with an affinity for special light setups. I think every photographer is that enthusiastic when it comes to one of his or her favourite spot that is covered in different light. Joel Meyerowitz, for example, whose exhibition I attended recently, explains one of his favourite spots in New York. He speaks about a skyscraper in the afternoon, where the sun hits the building and reflects, while the sun directly lights up the people, too. The setup is basically a natural two point lighting. In this case you have two different sources at the same moment. Here’s the difference.
Inhaltsverzeichnis
Light Types
First of all, different days tend to have different light. You will never get the same situation twice. Whether you shoot on a cloudy morning or with bright sunlight at noon, your results will vary a lot. As street photographers, we try to use the available light. But what’s the difference between all the situations and shadows?
Hard Light
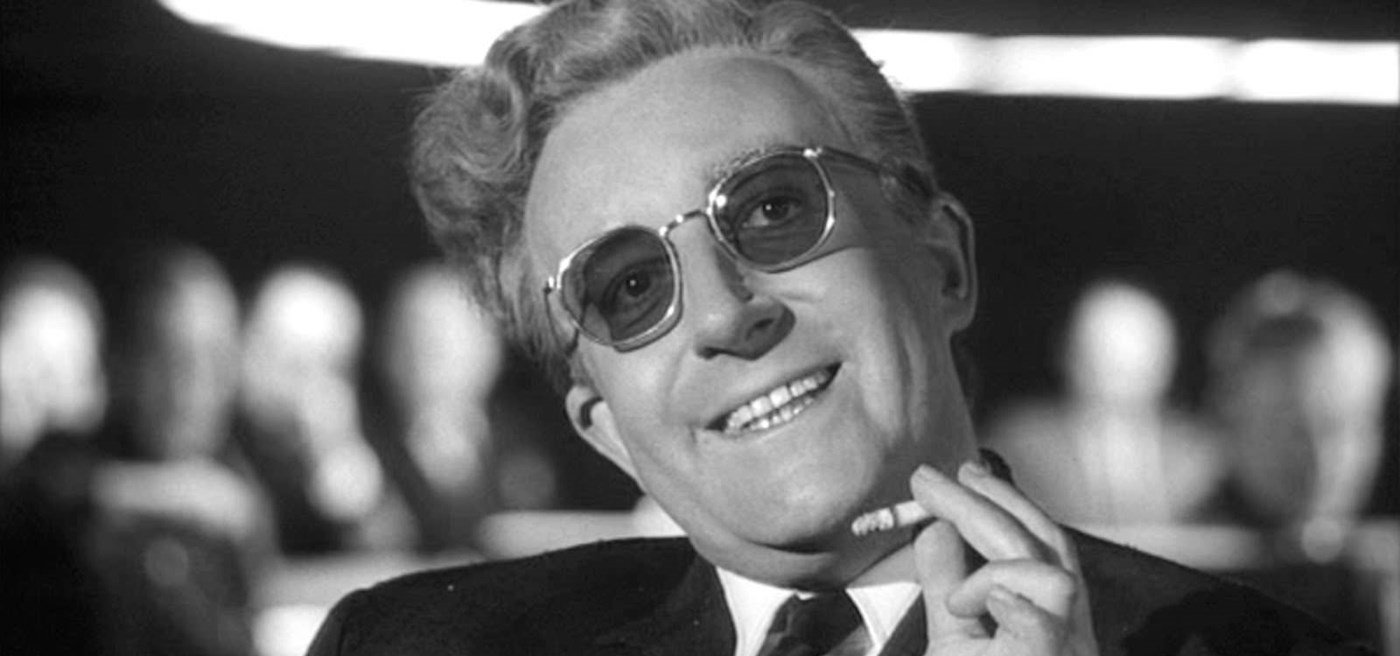
Usually produced by the sun or a flash. It’s called hard light, as it produces hard shadows and outlines. [Props to Captain Obvious]. As the sun is that far away from earth, we can assume it is a point. This strong light source illuminates the whole planet with spot light. When you hold your hand in direct sunlight, you will see a pretty sharp shadow on the floor. So it creates a lot of contrast. This results in a „scene“ impression, which is usually quite dramatic. A good looking example in my opinion would be Dr. Strangelove by Stanley Kubrick. Very dramatic. It creates a heavily emotional scene with the need for exact light directions. Imagine a women on the streets of Frankfurt in long dress with wavy fabric. The hard light creates a strong contrast on the dress and an enormous contrast that could underline the woman’s facial expression even more.
Soft Light

In opposite of the rough contrast of hard light, soft light will, obviously, soften the setup and produce a more atmospherical look with neutral impression. Out of this diffused setup, it creates ideally no shadow.
Imagine a cloudy day in the city. The clouds act as filter and diffusor. Now hold your hand out like in the first experiment. You mostly will not see any shadow. This setup is usually used in beauty shots with studio situations. You glue every peace of skin with super matte powder, use 2 tons of makeup and shoot with a 2 miles wide softbox. Things we may not have on street, but we know this type enlights our scene without creating a Hitler Nose-shadow.
Light Setups to keep in mind
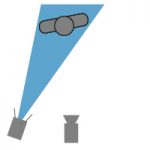
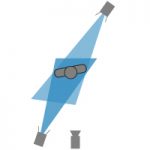
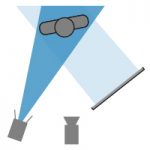
Classical 3 point scenic setup
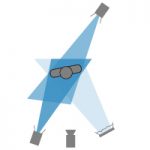
So, lets start with the basics. Back in the old Ivan Days (hint: analog production) where film had to be exposed really well, the Gaffer needed to look precisely at the light setup. The goal was to accomplish a bright setup with low shadows in order to not screw up the look. (see above). So we need a key light, which brightens up the scene. [See in the picture on the left.] This spot light produces the intensity we need to expose the film. But it also produces a real hard shadow. You can see the effect in the subject’s nose. A really rough shadow usually from the nose in the direction of the cheeks. See Dr. Strangelove above – uncool.
So we need to reduce this. As we can’t reduce the key light (let’s imagine it’s the sun), we need to reduce the effect by adding a second light source. The fill light. This soft light reduces the shadows and illuminates the scene further. We create a soft and nice look with an accurate exposure. Technically fine, okay-ish look.
But we don’t deal with okay-ish. We want to have the super extra cool and sharp and [insert marketing buzzwords here]-look. So the need of an additional, more look oriented spot is needed. The back light. The back light, usually from top down in the direction of the subjects shoulders, is just to create a small glow around his or her hair and a tiny reflection on the shoulders. This brings a vital impression into the scene.
Finally we have our picture not only technically exposed, but also designed in a way that looks simply amazing.
The sun
Now we forget the artificial light and nose thing for a moment. We want that bold stuff! As mentioned earlier, the sun creates a hard spot light. So, what would be more easy to accomplish than a single setup with a point light source?
Imagine a man, marked with rough skin, beard and long hair. He had pretty hard times. Tattoos could show some gang membership. Now imagine, you shoot his face with a striplight. This attempt to establish a beauty shot would kill the dramatic effect completely and wouldn’t suit the man and his situation. We need contrast. Hard, bright light in his face. That’s why we would use the spotlight ’sun‘ if possible.
So it’s a wonderful sunny day with blue sky at noon in Cape town. Easy peasy. We skip single clouds or a cloudy day for a moment.
The sun and a display window
In fact, one hard source of light can be difficult when it comes to a more relaxed impression or general purpose street shots. Therefore, you may consider a second source of light. As mentioned in the classical 3-point setup, the second light brightens up shadows. But it can also be used as back light. Back light creates an outer glow that makes the contour stronger. With that setup you can gain the attention of your viewer into a dedicated frame inside your picture. This could also be an light spot of some billboards, or other signs. In Germany, the traffic signs are coated with a reflective foil. You can use them to get a second source, without the need of a remote flash.
The city with reflections
We can use all kind of urban stuff around to get a second source of light. Hence, we want to focus a little more on sun plus a white wall or posters. When they’re white coated, it can be used as a classical reflector to reduce the main shadow or brighten up the situation. But it can also be used as beauty dish, where the soft light is just the small dot you need to not under-expose your picture. Also, this setup creates a more modern look of your picture and keeps the possibility to create a look in post processing.
I like this setup, as long as the environment is interesting and benefits the picture. It is more or less the standard setup in modern cities. You have larger buildings out of gentrification with modern architecture and a lot of glass. These throw shadows and sometimes block direct sunlight. But the glass can be used as reflector and if you choose the right side of the street, you even have back your sun plus a mirror.
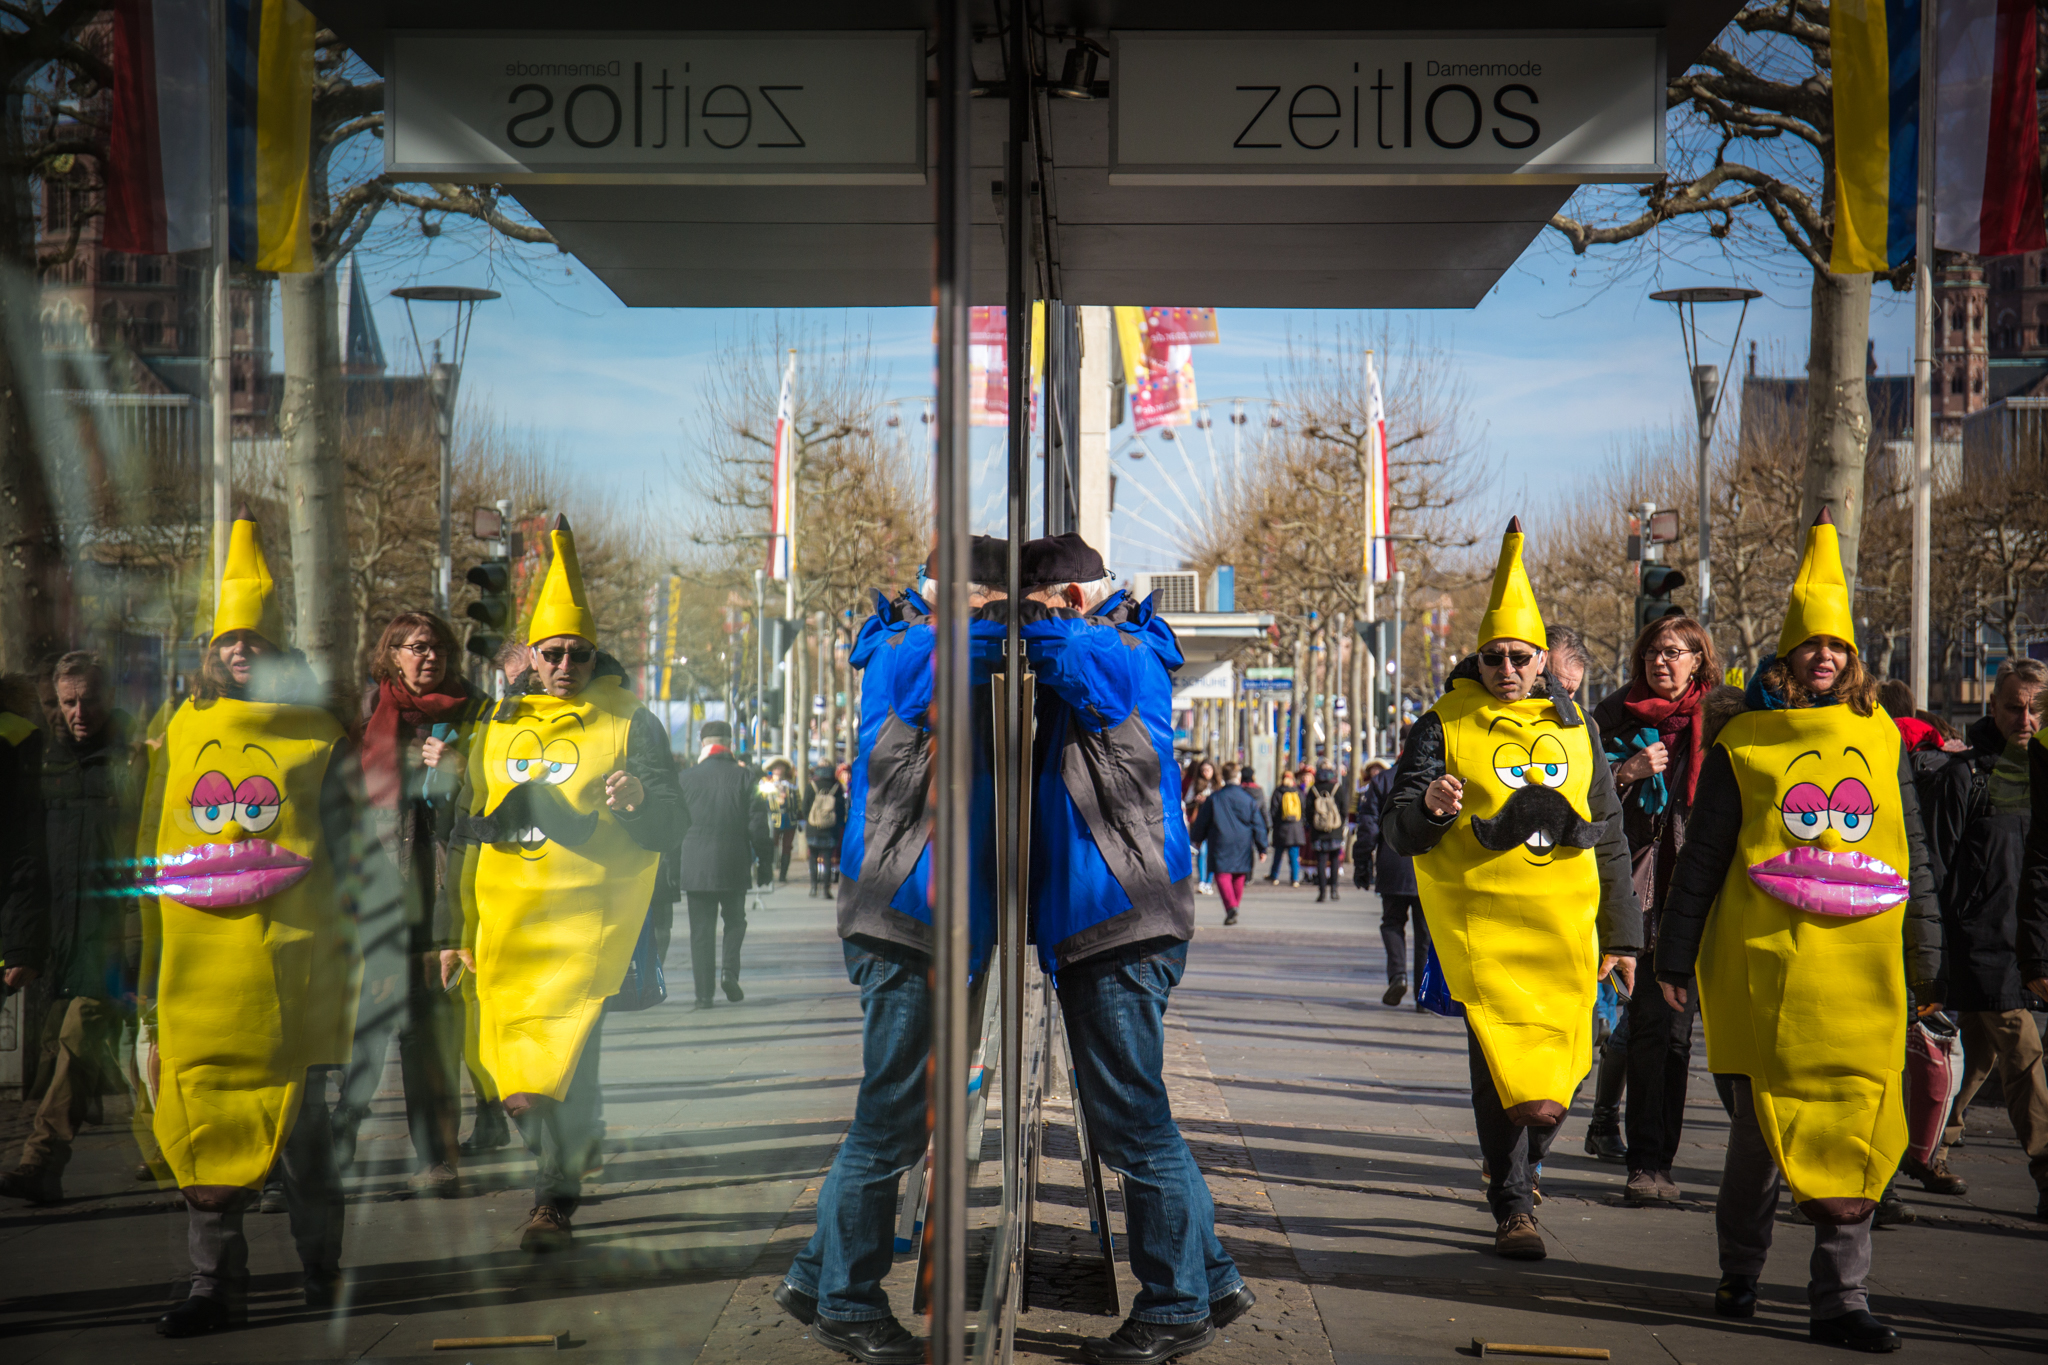 Bonus Knowledge: (I will drift a little to optics): When it comes to glass, it is important to know the basics or a reflection. When does a window act as a mirror and when as glass? Easy. As long as you’re at least +-45° from normal (see wiki) most of the light will pass the window. So you can see through. If you’re out of that angle, it will most probably act as mirror. E.g. is you’re standing parallel and right next to the window, it will reflect the light. And why „most probably“? Well, nowadays glass coatings result in a variation of that rule. But still, it is a basic rule to keep in mind.
6 Ways to work with light in Street Photography
Finally, to use this theoretical information from the previous sections in street photography, we need to transfer it into a more practical knowledge. Let’s have a look into real world setups and check actions.
#1: Choose the location
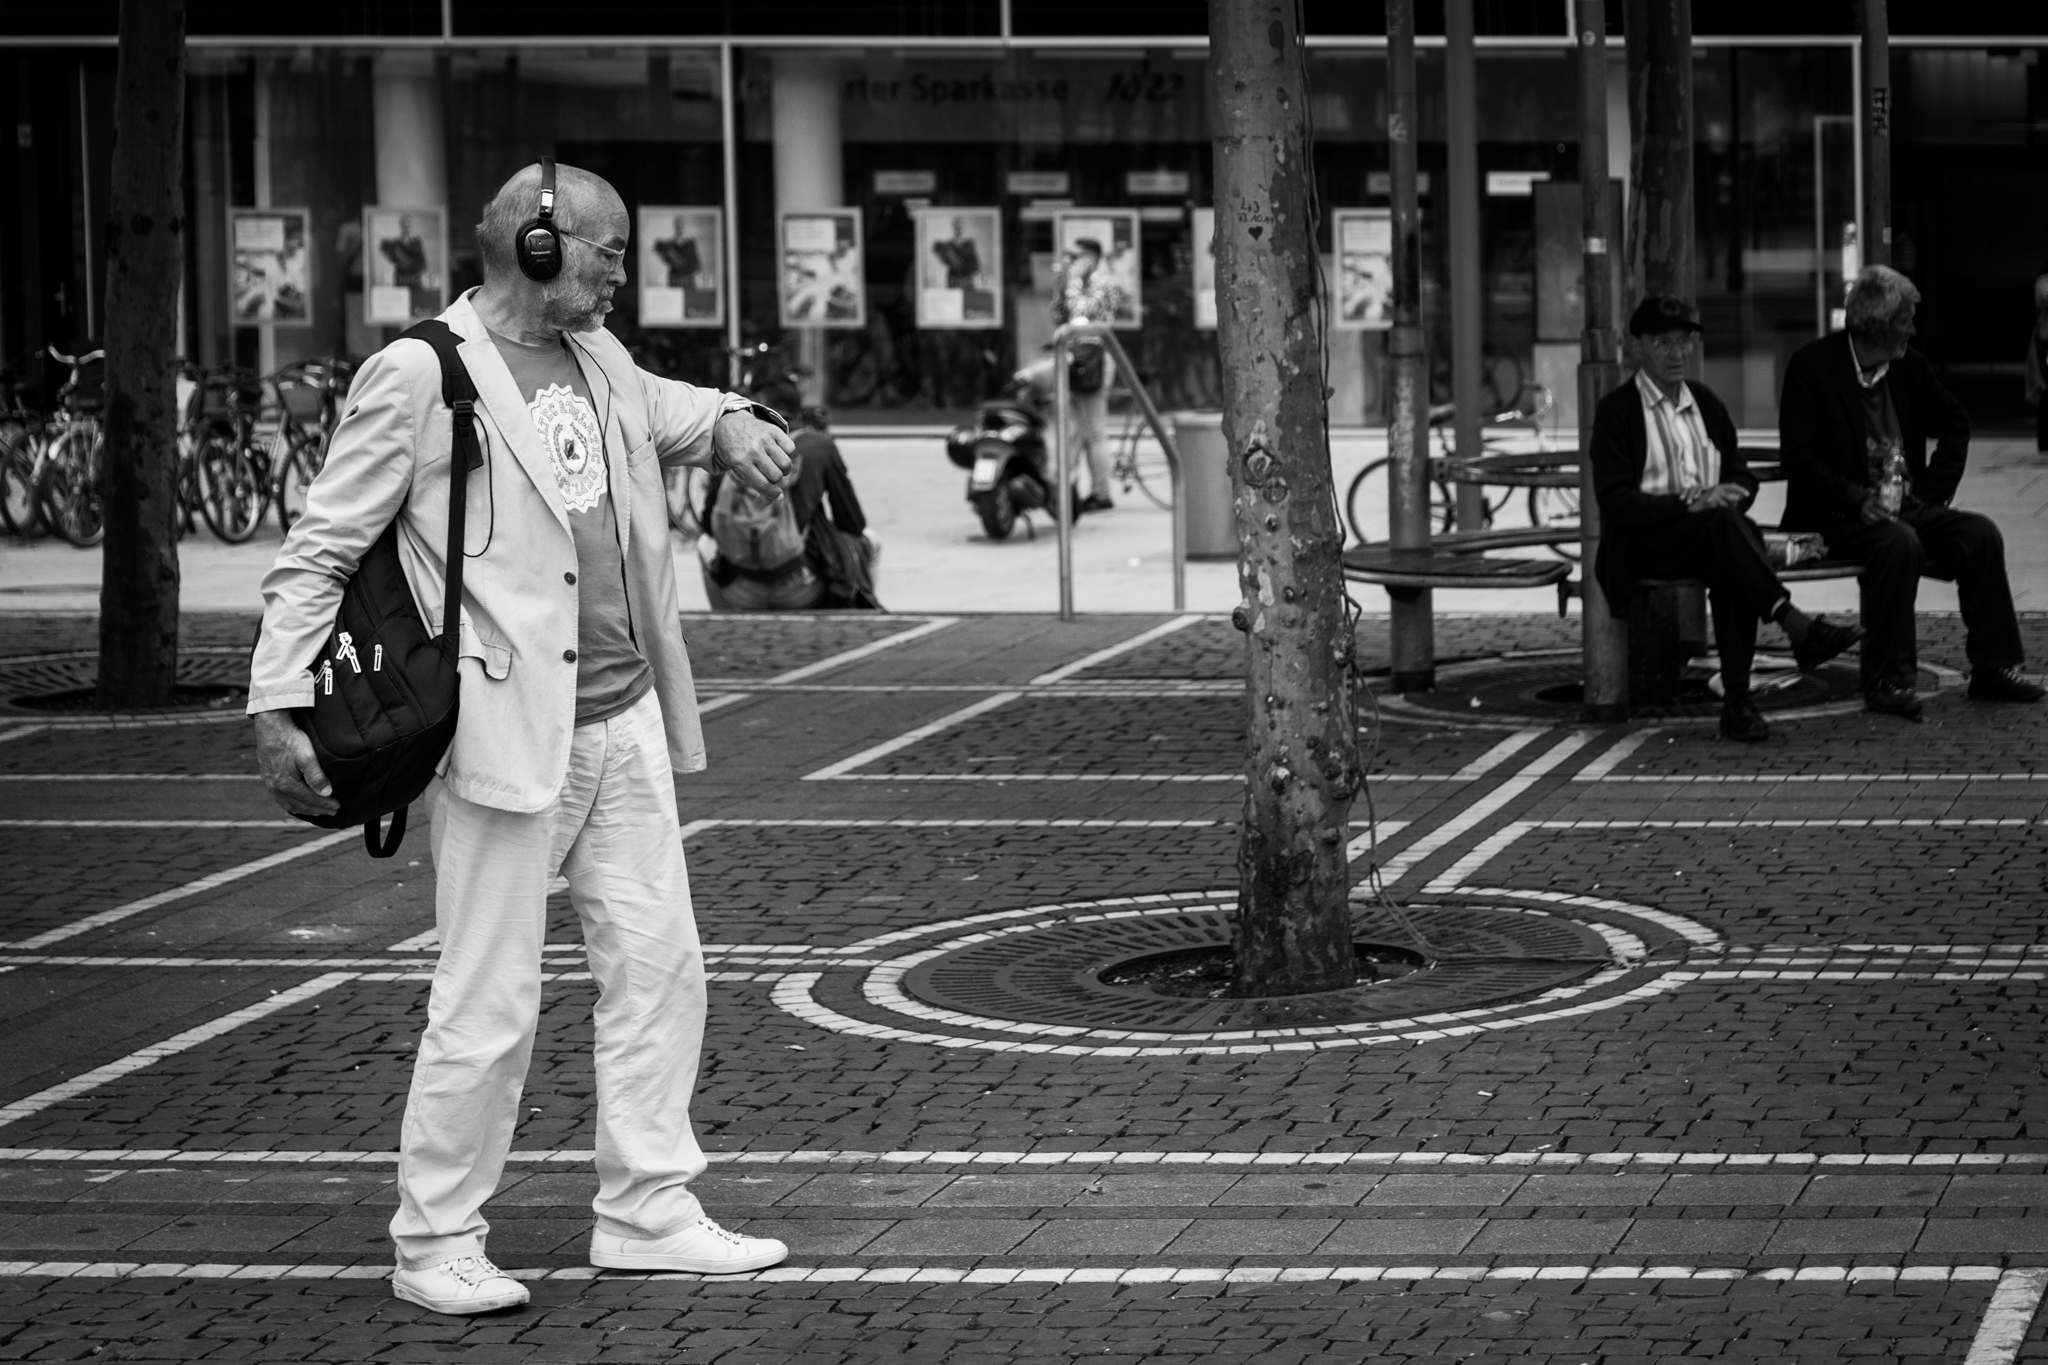
As you would expect, it is important to choose your location wisely. As Joel already said, there are magical places in every city, where we have a pretty rare light scene. Get to know these great places and stay for some minutes. I would even recommend to stay an hour or longer so you get an impression what people will appear. What kind of scene do you have? Is it a market place or is it a Metro station? Are you in a banking city like Frankfurt, where you have suits running around everywhere, or a simple park with exhausted sportsmen. The location is important for your thoughts around light.
#2: Check the right time
 Visit places at different times. You found a nice spot where you can relax and spend a lot of time? Where hundreds of people cross and personalities appear? Cool, now get to know the location in the 4th dimension – the Time. In this case you also get an impression where your light comes from and what colour it changes to. Yes, it’s probably black and white, but also a blue hour could make a great impression in a colour street shot. Not only light infects your shot, the shadow does so, too. Use this knowledge to gain extra attention to a situation, How do they move? What shape are they? Can I use this shadow and attach it to another? Buzzword: Perspective and field of view? In any case, have a clock handy.
#3: Keep track of the weather
You know soft light, you know hard light. So lets play with these. When it’s cloudy, you can get pretty nice shots of everyone, as the clouds act as natural diffusor. As a result, you get a good looking, balanced shot with no special effort. It is an easy setup especially in the city. Lots of indirect light coming from everywhere brighten up your location. Therefore, „bad“ weather without rain can be in fact good to make shots.
Sunshine behaves similarly. As discussed above, the hard light is key for a dramatic, scenic impression of your picture and the characters in it. Focus on a strong and bold picture where the people in it need that contrast or the landscape demands a stronger shadow. Use sunlight purposefully. It is a special, directed light, that can be formed in any shape, as long as you know where it comes from and which objects throw shadows.
And finally, when it’s raining, you could photograph umbrellas. Or simply go into the metro.
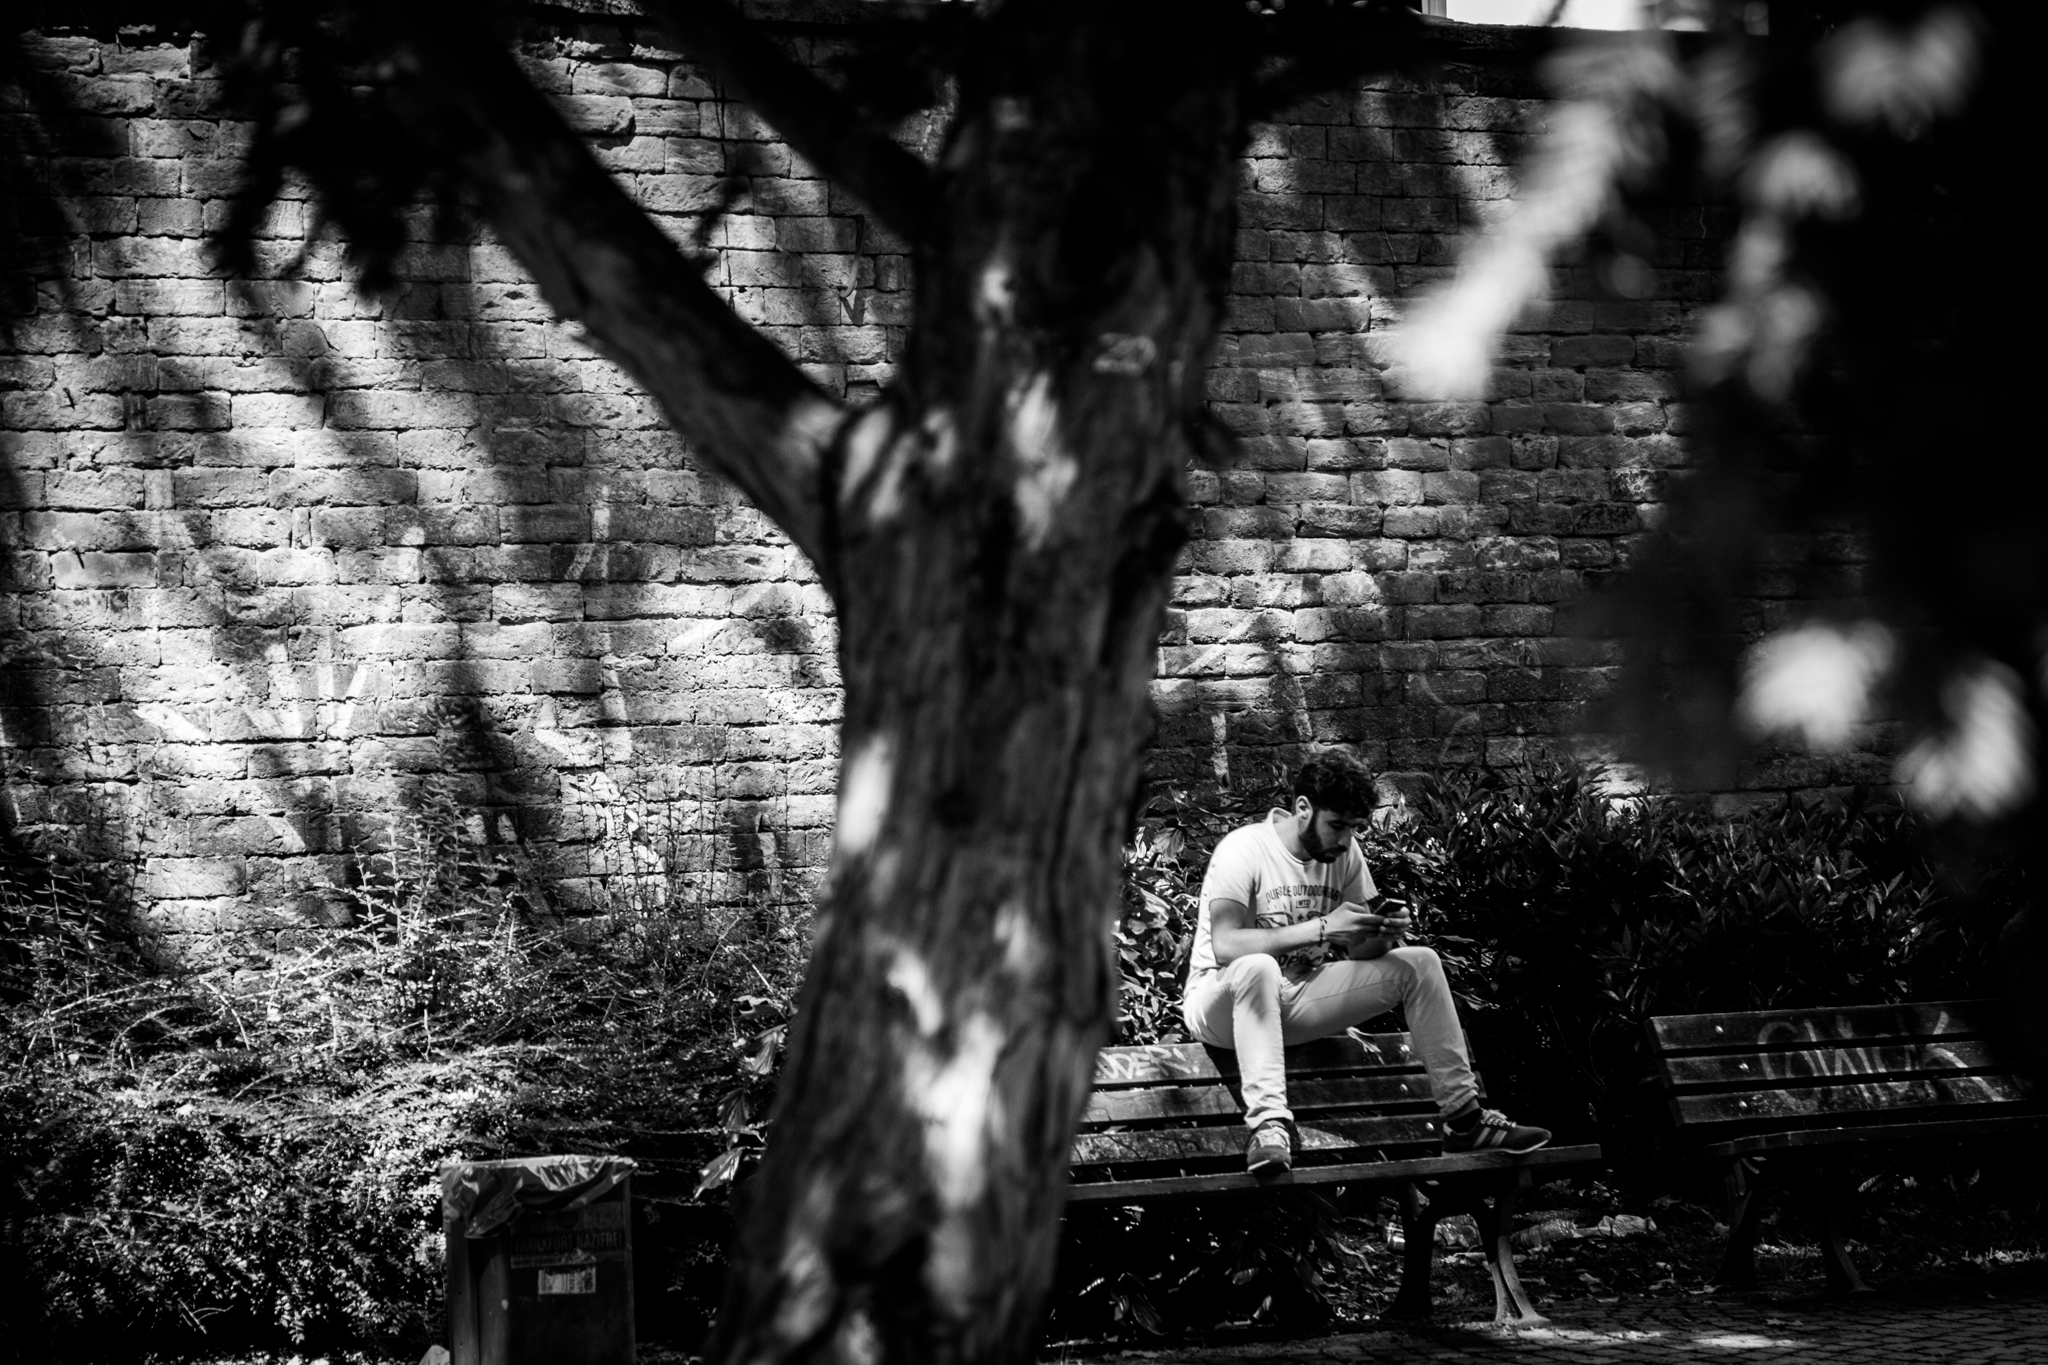
#4: Use walls as indirect light
Certainly, the indirect light is easy to use. Use the urban structures as reflector. Windows reflect more hard light where against painted walls act like a simple white reflector or striplight. This helps to reduce hard contrast and creates a more embedded look, as everything is covered in natural, available light. For example, a construction yard is mostly secured by a wooden fence. Hence, the wood creates a warm, orange looking light when direct sunlight hits it. You could use this for a couple holding hands. Or a family. Whatever needs a positive (as we tend to associate warm colours with warm feelings) impression.
#5: Know and Use available light
 As a result, you now know all different kinds of light in your city. Depending on the time, the material around you and the personal impression of a scene, you can choose between a wide range of light shapes. This brings you way ahead of other snapshot-like insta teens with crappy cheap software filters. Use this knowledge of available light to create astonishing street shots in your city, where you know even the tiniest reflection of a puddle.
#6: Flash those Faces
 Well, it’s simple. It’s night and you live in a small city without that many billboards. No moon, no cars, nothing. But it’s summer and there is this cozy and romantic bar where people tend to have dates. There are some tables outside with couples sitting right next to each other. That’s a classical Film Noir setup. The relationship between two people can be shown in the smooth candle light. Imagine you brighten this up with a remote flash from behind. Arrange the flash on the street with direction of the table(s). As it is dark and the people are busy with them self, no one will notice. Go around the bar opposite of the tables and shoot with the belly method, ideally with EyeAF. I promise, no one will imagine that you’re the photographer. People tend to look for the obvious. and that’s the flash.
So, to sum that up. A remote flash is a good extension for your gear. It decouples the photographer from the light source and can help to pull focus to a different spot than you are.
#6.2: Bonus: Use ND filters
Easy one: Use an ND filter. It blocks extra light. This can help you on a clear and sunny day in winter, where the streets are snowy and the light is bright. Now you want to have motion blur. Almost impossible, as all these reflections are way to much light for your sensor. Even a recovery in post processing wouldn’t help. So, block some light ahead of your sensor and shoot a balanced picture.
Finally to sum that up: Use billboards and traffic signs at night. Use reflections and soft light at day. Try things and ask for comments particularly with the light question in the topic. It will help you go further, gain experience and become an better artist. If you like, attend our upcoming picture discussion. Ask questions and look what others do. Think of creative ways to work with your toolbox and apply your new knowledge.
Rock’n’Roll, Lukas
PS: Fun Fact: As mentioned, film was difficult to expose. Good and bright Tungsten light was not yet developed and electricity was expensive. These were reasons why the majority of the film industry settled in a small valley in the states with blue sky. You even could install mirrors on top of the hills to reflect even more sun into the valley. This small spot is nowadays called Hollywood.